Creative Memories has great card stock that has an 80-pound paper weight, the perfect thickness for scrap booking, card making and all your other crafts. It coordinates wonderfully with the paper collections. Like all Creative Memories card stock and designer papers, it’s photo-safe (acid-free, lignin-free and bleed resistant) so it’s perfect for creating projects that look beautiful and will last for years to come. Check them out today. https://www.creativememories.com/cm/RebeccaRansdell
Tuesday, May 7, 2019
Monday, May 6, 2019
Weekly Sketch Round-Up April 29-May 3
Posted on by Creative Memories

Why do we love sketches so much? Is it the fact that they help break us out of a scrapboooking rut? Maybe it’s the fact that although we all see the same sketch, what we do with it varies completely depending on our taste, our style and our own creative preferences. No matter what the reason is, we love sketches, and if you love sketches too, then you’ll love today’s Weekly Sketch Round-Up! Check it out!
Sketch #1


Love the Imagine That! border shown above? Get the instructions here!
Sketch #2


Want to learn how to create this Happy Album layout? Get instructions here!
Sketch #3
Sketch #4
Friday, May 3, 2019
Travel Log Collection
The Travel Log Collection was inspired by overseas sightseeing and everyday explorations and boasts old-world travel themed imagery paired with modern styled elements. It's perfect for everything from trips abroad to cruises, weekend getaways at the cabin or cottage, road trips and other vacations.
Monday, April 29, 2019
Weekly Sketch Round-Up
Weekly Sketch Round-Up April 22-26
Posted on by Creative Memories

Have you ever heard the phrase “doing something is better than doing nothing”? It’s an important phrase to remember in all aspects of life, but it’s especially true for scrapbookers. Sometimes, we feel a lack of motivation. But, when that happens, the best way to get out of that funk is to just sit down and create something, no matter how unfinished it looks or how little you do. Still need a push in the right direction? Check out the Weekly Sketch Round-Up for some ideas to get you started!
Sketch #1

Check out these instructions on how to create this Happy Album layout for yourself!
Sketch #2
Learn how to make this layout by following the instructions in this blog post.
Sketch #3


Get instructions for how to create this layout in this blog post.
Sketch #4
These layouts will definitely keep you busy throughout the week. Even if you don’t get around to creating all of these sketches, remember the golden rule of scrapbooking: Creating something is always better than creating nothing. What will you try to create this week?
Friday, April 26, 2019
Creative Memories Blog post
This was on the Creative Memories Blog, I am gonna have to get these stickers for my camping layouts. Check these out for yourself. https://www.creativememories.com/cm/RebeccaRansdell

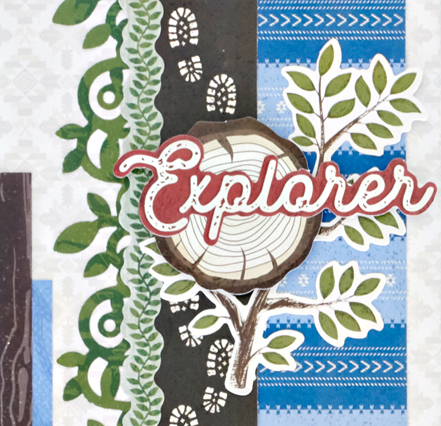
What type of outdoor adventures do you like to go on? Are you a camper? A hiker? Do you enjoy spending time on the water? No matter what you like to do when you spend time with Mother Nature, there’s an Explorer sticker for it! These outdoor scrapbook stickers are perfect for decorating layouts for any nature lover. Check out this outdoor scrapbook layout that uses the Explorer stickers in a fun and exciting way!

To create this layout, you’ll need:
- Explorer Paper Pack or (Shop Canada | Shop Australia)
- Explorer Stickers or (Shop Canada | Shop Australia)
- On the Vine Border Punch or (Shop Canada | Shop Australia)
- 12-inch Trimmer or (Shop Canada | Shop Australia)
- Tape Runner with Repositionable Adhesive or (Shop Canada | Shop Australia)
- Foam Squares or (Shop Canada | Shop Australia)
- Black Dual-Tip Pen or (Shop Canada | Shop Australia)

Step 1: Use the cream patterned paper as the base for the layout.
Step 2: Cut a 3″ x 12″ strip of striped paper and adhere it vertically to the right side of the layout, about 1/4″ in from the edge. Cut the footprints strip from the varied border patterned paper. Adhere it to the left side of the blue striped strip.
 Step 3: Punch a border using the On the Vine Border Punch with green patterned paper. Tuck it just barely behind the left edge of the blue striped strip. Adhere a leafy garland border sticker to the left of the footprints. Add the branch, wood slice and “Explorer” stickers with Foam Squares, as shown.
Step 4: Cut a 7″ x 5″ piece of brown wood patterned paper and a 4″ x 6″ piece of green plaid and blue patterned papers. Arrange as shown on the left side of the layout.
Step 5: Mat two 5-3/4″ x 3-3/4″ photos with 6″ x 4″ pieces of red paper. Adhere to the layout.

Step 6: Add the rustic wood sign, branch and “May the Forest be With You” stickers to the bottom left of the layout. Journal as desired.
These outdoor scrapbook stickers are perfect for bringing life to all your nature and wilderness photos. Which of these stickers do you love the most? Let us know in the comments below!
Subscribe to:
Comments (Atom)


