Make layouts and projects look fresh and sweet with the Pineapple Punch! This pineapple scrapbook punch creates a perfectly ripe pineapple cutout to bring a taste of the tropics straight to your crafts.
Showing posts with label CREATIVE MEMORIES. Show all posts
Showing posts with label CREATIVE MEMORIES. Show all posts
Saturday, January 9, 2021
Friday, January 8, 2021
Boho Escape Collection by Creative Memories
Get a taste of the tropics with a bohemian twist with the Boho Escape collection! These boho scrapbook supplies were inspired by sunny days and carefree vacation vibes, and are brought to life with a tropical, earthy palette of olive and dark green, mint, terra cotta, salmon pink, mustard yellow and navy. The collection includes an album cover, two paper packs, a mat pack, stickers, embellishments and Fast2Fab™ products, and it’s ideal for your photos of the outdoors, beach days, time with friends and family and romantic getaway trips.
Tuesday, October 6, 2020
Christmas Stockings Border Maker Cartridge by Creative Memories
Adorn your Christmas scrapbook layouts with borders from the ultimate stocking stuffer — the Christmas Stockings Border Maker Cartridge! This cartridge creates a continuous Christmas stockings border design that is perfect for your Christmas layouts and projects.
Thursday, September 17, 2020
Hello, Autumn Stickers by Creative Memories
Piles of smiles (and picturesque projects!) are yours for the taking with Hello, Autumn Stickers! These fall stickers rake in autumnal icons like orange and white pumpkins, acorns, apples and clusters of leaves, along with one sheet of phrases that give a call to fall like “Our lil’ pumpkin,” “Crisp leaves” and “Autumn fest,” as well as one sheet of complementing border stickers
Wednesday, September 16, 2020
PRODUCT TIP AND DEMO - WEDNESDAY
Arch Border Frame Punch by Creative Memories
Curve your creativity with the Arch Border Frame Punch, which creates a pleasing architectural aesthetic with its archway cutout design — perfect for making borders or frames!
Apple Recipe Template by Creative Memories
The Apple Recipe Template is core to making one-of-a-kind layouts! The sliced shapes in this apple template bring crisp autumn a-peel to fruition as you trace and cut papers and photos to fit the stencil, making it easy to create an unlimited number of professional-looking layouts
Shop the latest and greatest
https://www.creativememories.com/cm/RebeccaRansdell
Follow me on facebook
https://www.facebook.com/ForeverMemoriesbyRebecca
Tuesday, September 15, 2020
Apple Chain Border Maker Cartridge by Creative Memories
Creativity is ripe for the picking with the Apple Chain Border Maker Cartridge! With this apple border maker cartridge, you’ll be able to treat your projects with crisp continuous apple cutouts — no matter how you slice it!
Shop the latest and greatest
https://www.creativememories.com/cm/RebeccaRansdell
Follow me on facebook
https://www.facebook.com/ForeverMemoriesbyRebecca
Monday, September 14, 2020
Hello, Autumn Collection by Creative Memories
Pumpkin spice and everything nice are in store for you with the Hello, Autumn collection! This collection includes a foiled album cover, two paper packs, mat pack, foiled embellishments, stickers and Fast2Fab™ products, and it’s ideal for photos of all things autumn like taking scenic fall foliage drives, visiting corn mazes, picking fresh apples, Halloween, Thanksgiving and family gatherings.
Tuesday, July 9, 2019
Good Day Card Kit
“The NEW Good Day Card Kit is now available and you’re going to love it!
 This kit is perfect for creating beautiful handmade cards you can send to your friends and
family. It’s absolutely
charming and makes it so easy to create cards for any occasion.”
This kit is perfect for creating beautiful handmade cards you can send to your friends and
family. It’s absolutely
charming and makes it so easy to create cards for any occasion.”
Contact me today to get your kit!!!
https://www.creativememories.com/cm/RebeccaRansdell
Have a beautiful crafty day!!!!
Rebecca

Contact me today to get your kit!!!
https://www.creativememories.com/cm/RebeccaRansdell
Have a beautiful crafty day!!!!
Rebecca
Sunday, May 26, 2019
Deep Blue Sea Collection
The new Deep Blue Sea collection is perfect for bringing life to all your nautical photos. You’ll love using it for all sorts of layouts of cruises, beach days, yachting, sailing, vacations by the water and more! With Deep Blue Sea, creating a nautical scrapbook layout can be as fun and relaxing as the aquatic adventure you’re commemorating! Check out this calming coastal scrapbook layout and get ready to make a splash!
https://www.creativememories.com/cm/RebeccaRansdell


https://www.creativememories.com/cm/RebeccaRansdell


Thursday, May 9, 2019
From the Creative Memories Blog
Take a Fresh Approach to Mother’s Day with this DIY Card

They say when it comes to giving gifts, it’s the thought that counts. What better way for a crafter to show how much they care than with a DIY card? With Mother’s Day right around the corner, now is the perfect time to learn how to create a fun, spring-themed DIY Mother’s Day card that mom is sure to love! Find out how in today’s post!
You can create this card using any Creative Memories collection! But to create this project with the products shown, you will need:
- NSD 2019 Gift Embellishments
- NSD Project Recipe™ Kit
- 12-inch Trimmer with the Scoring Blade or (Shop Canada | Shop Australia)
- Tape Runner or (Shop Canada | Shop Australia)
- Repositionable Adhesive or (Shop Canada | Shop Australia)
- Foam Squares or (Shop Canada | Shop Australia)
To get the exclusive NSD Project Recipe™ Kit and Gift Embellishments, contact me or go directly to my CM order page https://www.creativememories.com/cm/RebeccaRansdell

Step 1: Cut a card base out of White Cardstock measuring 4-1/4″ x 11″. Use the Scoring Blade with the 12-inch Trimmer to score at 2-3/4″ from each end. This will create a gate fold card.
Step 2: For the front of the card, cut two pieces of Evergreen Cardstock to measure 2-5/8″ x 4-1/8″ and mount them on the two front panels of the card. Cut two pieces of the daisy patterned paper to measure 4″ x 2-1/2″ and mount them on the two front panels, leaving an equal border of the Evergreen Cardstock showing.


Step 3: Cut a piece of the striped patterned pattern to measure 1″ x 4″ and cut a flag end in to one side. Tip: Use the embellishment flags as a guide to cut the flag — just trace and cut! Adhere the striped strip to the right hand side of the card being sure to have adhesive only on the paper that overlaps the right hand side and not at all on the paper that will overlap the left side (otherwise the card will be adhered shut). Use some of the NSD Embellishments to add a greeting and a cute little bee with some Foam Squares.
Step 4: For the inside of the card, cut a piece of Evergreen Cardstock to measure 4″ x 5-1/4″ and adhere to the middle panel of the inside of the card. Then, take the yellow hexagon patterned paper and cut a rectangle measuring 3-1/2″ x 4-1/2″ and adhere that to the middle of the Evergreen Cardstock. Use a cute little bee to embellish the bottom corner. Journal as desired.
No matter who you make this card for, they’re going to love the thought and attention to detail that you put into it. It’s a beautiful card that can be used for a multitude of spring and summertime occasions, especially Mother’s Day! What other crafty ways do you celebrate Mother’s Day? Let us know in the comments below!
Tuesday, May 7, 2019
Creative Memories has great card stock that has an 80-pound paper weight, the perfect thickness for scrap booking, card making and all your other crafts. It coordinates wonderfully with the paper collections. Like all Creative Memories card stock and designer papers, it’s photo-safe (acid-free, lignin-free and bleed resistant) so it’s perfect for creating projects that look beautiful and will last for years to come. Check them out today. https://www.creativememories.com/cm/RebeccaRansdell

Friday, May 3, 2019
Travel Log Collection
The Travel Log Collection was inspired by overseas sightseeing and everyday explorations and boasts old-world travel themed imagery paired with modern styled elements. It's perfect for everything from trips abroad to cruises, weekend getaways at the cabin or cottage, road trips and other vacations.


Friday, April 26, 2019

Creative Memories Blog post
This was on the Creative Memories Blog, I am gonna have to get these stickers for my camping layouts. Check these out for yourself. https://www.creativememories.com/cm/RebeccaRansdell

What type of outdoor adventures do you like to go on? Are you a camper? A hiker? Do you enjoy spending time on the water? No matter what you like to do when you spend time with Mother Nature, there’s an Explorer sticker for it! These outdoor scrapbook stickers are perfect for decorating layouts for any nature lover. Check out this outdoor scrapbook layout that uses the Explorer stickers in a fun and exciting way!

To create this layout, you’ll need:
- Explorer Paper Pack or (Shop Canada | Shop Australia)
- Explorer Stickers or (Shop Canada | Shop Australia)
- On the Vine Border Punch or (Shop Canada | Shop Australia)
- 12-inch Trimmer or (Shop Canada | Shop Australia)
- Tape Runner with Repositionable Adhesive or (Shop Canada | Shop Australia)
- Foam Squares or (Shop Canada | Shop Australia)
- Black Dual-Tip Pen or (Shop Canada | Shop Australia)

Step 1: Use the cream patterned paper as the base for the layout.
Step 2: Cut a 3″ x 12″ strip of striped paper and adhere it vertically to the right side of the layout, about 1/4″ in from the edge. Cut the footprints strip from the varied border patterned paper. Adhere it to the left side of the blue striped strip.
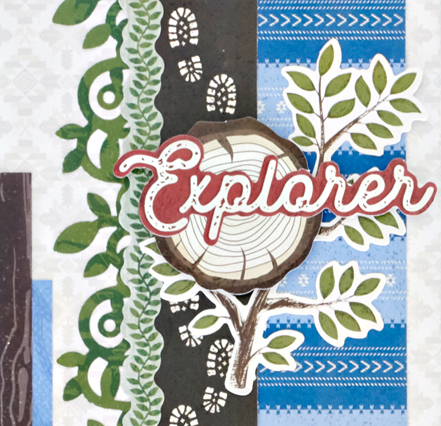 Step 3: Punch a border using the On the Vine Border Punch with green patterned paper. Tuck it just barely behind the left edge of the blue striped strip. Adhere a leafy garland border sticker to the left of the footprints. Add the branch, wood slice and “Explorer” stickers with Foam Squares, as shown.
Step 4: Cut a 7″ x 5″ piece of brown wood patterned paper and a 4″ x 6″ piece of green plaid and blue patterned papers. Arrange as shown on the left side of the layout.
Step 5: Mat two 5-3/4″ x 3-3/4″ photos with 6″ x 4″ pieces of red paper. Adhere to the layout.

Step 6: Add the rustic wood sign, branch and “May the Forest be With You” stickers to the bottom left of the layout. Journal as desired.
These outdoor scrapbook stickers are perfect for bringing life to all your nature and wilderness photos. Which of these stickers do you love the most? Let us know in the comments below!
Friday, April 19, 2019
Though the Recipe Templates aren't brand new on Creative Memories they are new to me. I got my first template yesterday and I am gonna give it a try this weekend. This looks like a great way to get some fun and exciting layouts, can't wait!!! Check them out and contact me to get started on creating fun pages of your memories. https://www.creativememories.com/cm/RebeccaRansdell

Do you ever find yourself wanting to create more complex and colorful scrapbook layouts, but don’t want to try and freehand something and risk it looking cluttered or disorganized? If that sounds familiar, we’ve got something you’ll love… Recipe Templates! Recipe Templates are the perfect tool for creating intricate, professional-looking scrapbook layouts. In today’s post, you’ll get the 411 on Recipe Templates, including what they are, how to use them and – of course – examples of the layouts you can make! Let’s take a look!

Recipe Templates are 12×12 mylar stencils featuring an assortment of shapes. They serve as a guide for creating a variety of unique layouts depending on the template you use and which shapes you choose to follow on the template.


")
Pictured Left: Collage Wreath Recipe Template, Top Right: Sweetheart Recipe Template, Bottom Right: Sunburst Recipe Template

Step #1: Gather Your Materials
The first thing you need to do is decide what papers and photos you want your layout to consist of. Pick out papers that you think would work well together, and then decide which photos and how many photos you want the layout to consist of. Come up with a vision for how you want the layout to look before you start tracing and cutting the papers — it makes the process a lot simpler in the long run.

Step #2: Trace Shapes for Papers
Place the template atop the background of the first paper you want to use (hint: Multi-Purpose Clips are very handy to secure the template to the page). Using a pencil, trace the section of the layout that you’d like to use with that paper. Make sure you keep the pencil straight up and down so you don’t move the template if you’re not using Multi-Purpose Clips! Continue to trace until all the sections of the layout are accounted for on the different papers. Make sure you don’t leave any sections unaccounted for!

Step #3: Cut & Adhere Papers
Now that you’ve traced your pieces, it’s time to cut out the traced shapes and adhere them to the layout following the template! Use either a pair of scissors or a 12-inch Trimmer to make sure all your cuts are crisp. Switch the Recipe Template and Multi-Purpose Clips over to the background page so you know that you’re putting the paper in the right spot. Once you’ve determined it’s in the right spot, use a Tape Runner to adhere the cutouts to the page. Repeat this step for all of the paper cutouts. Note: You can cut and adhere pieces as soon as you’re done tracing them in step two as well; you don’t have to wait until all your shapes are traced to start cutting and adhering.
Step #4: Trace Shapes for Photos & Adhere
Once all the papers are placed, it’s time to add the photos. Take your photos and put them under the Recipe Template. Using a Photo-Labeling Pencil, trace the shape that the template requires onto the photo. After the shape has been outlined, use either a pair of scissors or the 12-inch Straight Trimmer to make the appropriate cuts. Adhere the photo to the page using a Tape Runner.

Step #5: Decorate!
After everything is on the page, it’s time to decorate! Embellish and journal on your layout as desired. Just like that, your layout is complete!

Watch the process unfold in this video!

There are so many unique layouts that you can create with Recipe Templates! Try rotating the template, using different paper packs and color combinations or whatever else strikes your fancy! Check out these finished layouts that were made using the Blend & Bloom collection with the Collage Wreath Recipe Template!

")
")
Fun fact: The Collage Wreath Recipe Template was recently featured on Creative Scrapbooker Magazine’s blog with the layouts below created by contributor Noreen Smith. You can get step-by-step instructions to make her layouts here!


So there you have it – everything you could possibly want to know about Recipe Templates! Which CM Recipe Template is your favorite? Let us know in the comments below! And tell us… will you be trying a Recipe Template in the near future?!
Subscribe to:
Comments (Atom)