Friday, April 26, 2019

Creative Memories Blog post


This was on the Creative Memories Blog, I am gonna have to get these stickers for my camping layouts.  Check these out for yourself.  https://www.creativememories.com/cm/RebeccaRansdell


What type of outdoor adventures do you like to go on? Are you a camper? A hiker? Do you enjoy spending time on the water? No matter what you like to do when you spend time with Mother Nature, there’s an Explorer sticker for it! These outdoor scrapbook stickers are perfect for decorating layouts for any nature lover. Check out this outdoor scrapbook layout that uses the Explorer stickers in a fun and exciting way!
Explorer-Scrapbook-Layout3-Creative-Memories
To create this layout, you’ll need:
instructions
Step 1: Use the cream patterned paper as the base for the layout.
Step 2: Cut a 3″ x 12″ strip of striped paper and adhere it vertically to the right side of the layout, about 1/4″ in from the edge. Cut the footprints strip from the varied border patterned paper. Adhere it to the left side of the blue striped strip.
Explorer-Scrapbook-Layout3-Creative-Memories2
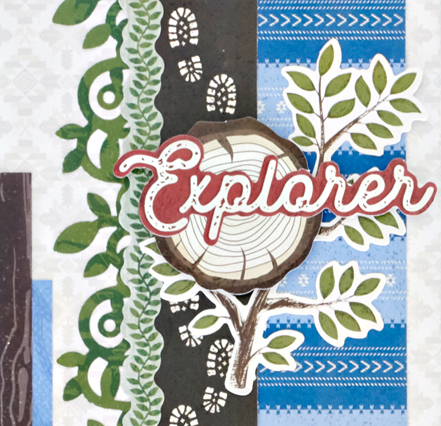
Step 3: Punch a border using the On the Vine Border Punch with green patterned paper. Tuck it just barely behind the left edge of the blue striped strip. Adhere a leafy garland border sticker to the left of the footprints. Add the branch, wood slice and “Explorer” stickers with Foam Squares, as shown.
Step 4: Cut a 7″ x 5″ piece of brown wood patterned paper and a 4″ x 6″ piece of green plaid and blue patterned papers. Arrange as shown on the left side of the layout.
Step 5: Mat two 5-3/4″ x 3-3/4″ photos with 6″ x 4″ pieces of red paper. Adhere to the layout.
Explorer-Outdoor-Themed-Stickers-Creative-Memories
Step 6: Add the rustic wood sign, branch and “May the Forest be With You” stickers to the bottom left of the layout. Journal as desired.
These outdoor scrapbook stickers are perfect for bringing life to all your nature and wilderness photos. Which of these stickers do you love the most? Let us know in the comments below!

Tuesday, April 23, 2019

Weekly Sketch Round Up


When it comes to scrapbooking, where do you draw your inspiration from? Do you scroll through Pinterest boards (preferably the CM boards) looking for ideas? Are you struck with new ideas after taking a long walk in your neighborhood? Or is the inspiration always there as you look through your pictures? Regardless of however you get inspired, you can always rely on the Weekly Sketch Round-Up for layout ideas that you can channel your inspiration and ideas into. Check it out!

Sketch #1

Curious how to make the Outdoor Blues layout above? Get the details here!

Sketch #2

ImagineThat_Border2_Sketch (1)ImagineThat_Border2 (1)
Love the Imagine That! scrapbook border shown above? Get the instructions here!

Sketch #3

MermaidCove_Border2_Sketch (1)MermaidCove_Border2 (1)
Love this Mermaid Cove border? Get instructions on how to make it here!

Sketch #4

Want to learn how to make this Easter layout? Get instructions here!
No matter where you get your inspiration, we hope that you’re able to use these layout sketches to channel your creativity and fuel it in a productive way! Which one of these sketches will YOU try this week?
https://www.creativememories.com/cm/RebeccaRansdell

Friday, April 19, 2019


Though the Recipe Templates aren't brand new on Creative Memories they are new to me.  I got my first template yesterday and I am gonna give it a try this weekend.  This looks like a great way to get some fun and exciting layouts, can't wait!!!   Check them out and contact me to get started on creating fun pages of your memories.    https://www.creativememories.com/cm/RebeccaRansdell


Do you ever find yourself wanting to create more complex and colorful scrapbook layouts, but don’t want to try and freehand something and risk it looking cluttered or disorganized? If that sounds familiar, we’ve got something you’ll love… Recipe Templates! Recipe Templates are the perfect tool for creating intricate, professional-looking scrapbook layouts. In today’s post, you’ll get the 411 on Recipe Templates, including what they are, how to use them and – of course – examples of the layouts you can make! Let’s take a look!
virtual crop
Recipe Templates are 12×12 mylar stencils featuring an assortment of shapes. They serve as a guide for creating a variety of unique layouts depending on the template you use and which shapes you choose to follow on the template.
Pictured Left: Collage Wreath Recipe Template, Top Right: Sweetheart Recipe Template, Bottom Right: Sunburst Recipe Template
virtual-crop-1.png

Step #1: Gather Your Materials

The first thing you need to do is decide what papers and photos you want your layout to consist of. Pick out papers that you think would work well together, and then decide which photos and how many photos you want the layout to consist of. Come up with a vision for how you want the layout to look before you start tracing and cutting the papers — it makes the process a lot simpler in the long run.
recipetemplate_collagewreath_flyer_element1

Step #2: Trace Shapes for Papers

Place the template atop the background of the first paper you want to use (hint: Multi-Purpose Clips are very handy to secure the template to the page). Using a pencil, trace the section of the layout that you’d like to use with that paper. Make sure you keep the pencil straight up and down so you don’t move the template if you’re not using Multi-Purpose Clips! Continue to trace until all the sections of the layout are accounted for on the different papers. Make sure you don’t leave any sections unaccounted for!
recipetemplate_collagewreath_flyer_element2

Step #3: Cut & Adhere Papers

Now that you’ve traced your pieces, it’s time to cut out the traced shapes and adhere them to the layout following the template! Use either a pair of scissors or a 12-inch Trimmer to make sure all your cuts are crisp. Switch the Recipe Template and Multi-Purpose Clips over to the background page so you know that you’re putting the paper in the right spot. Once you’ve determined it’s in the right spot, use a Tape Runner to adhere the cutouts to the page. Repeat this step for all of the paper cutouts. Note: You can cut and adhere pieces as soon as you’re done tracing them in step two as well; you don’t have to wait until all your shapes are traced to start cutting and adhering.

Step #4: Trace Shapes for Photos & Adhere

Once all the papers are placed, it’s time to add the photos. Take your photos and put them under the Recipe Template. Using a Photo-Labeling Pencil, trace the shape that the template requires onto the photo. After the shape has been outlined, use either a pair of scissors or the 12-inch Straight Trimmer to make the appropriate cuts. Adhere the photo to the page using a Tape Runner.
recipetemplate_collagewreath_flyer_element3.jpg

Step #5: Decorate!

After everything is on the page, it’s time to decorate! Embellish and journal on your layout as desired. Just like that, your layout is complete!
catalog-q1-2019-creative-memories-2 (4)

Watch the process unfold in this video!

add heading (1)

There are so many unique layouts that you can create with Recipe Templates! Try rotating the template, using different paper packs and color combinations or whatever else strikes your fancy! Check out these finished layouts that were made using the Blend & Bloom collection with the Collage Wreath Recipe Template!
Fun fact: The Collage Wreath Recipe Template was recently featured on Creative Scrapbooker Magazine’s blog with the layouts below created by contributor Noreen Smith. You can get step-by-step instructions to make her layouts here!
So there you have it – everything you could possibly want to know about Recipe Templates! Which CM Recipe Template is your favorite? Let us know in the comments below! And tell us… will you be trying a Recipe Template in the near future?!

Thursday, April 18, 2019

Here is a great way to display those memories.  Contact me today to get started.
  https://www.creativememories.com/cm/RebeccaRansdell
 

Tuesday, April 16, 2019

Creative Memories - The Storytime Baby Collection

The Storytime baby collection was inspired by simple baby linens, quirky animal illustrations and all the current nursery trends for both boys and girls. It is perfect for baby shower pages, invites, birth announcements and baby's first year books. Take a look at this cute, adorable collection today.

https://www.creativememories.com/cm/RebeccaRansdell